Database
-
[Oracle] Compress2024.02.29
-
[Oracle] Transaction과 Record2024.02.21
-
RMAN2023.11.12
-
[Oracle] 자주 쓰는 명령어2023.11.10
-
[SQL] 명령어2023.03.17
-
[MySQL] 접속2023.03.16
-
[MariaDB] 삭제2023.03.16
-
[Oracle] 관리자 계정(system, sys) 비밀번호 변경2023.03.16
[Oracle] Compress
● 서버 스토리지 부족 시 TBL 압축을 위해 Compress 옵션 사용 (단, DML이 잦으면 역효과일 수 있음)
● Relation Data 처리를 위한 알고리즘으로 DB Block 내 다수의 column의 중복된 값을 제거하여 compression을 수행
● 새로운 data를 bulk insert, bulk load 또는 insert, update 시 compression 사용 가능
● Compress된 block은 compression과 관련된 meta data를 symbol table에 저장함
ㄴ uncompressed table과 가장 큰 차이
ㄴ symbol table : block의 상단에 위치
※ 사용 전 테이블의 속성을 파악하여 DML 이력 확인 권고
SQL> SELECT INSERTS, UPDATES, DELETES FROM DBA_TAB_MODIFICATIONS WHERE TABLE_NAME = 'TEST';

   INSERTS    UPDATES    DELETES
---------- ---------- ----------
         0      12657          0
Basic Compression
Direct path I/O 로 생성된 block만 압축함
하나의 segment에 여러 형태의 block이 혼재할 수 있음
ㄴ Compressed block (Direct Path I/O)
Uncompressed block (Conventional Path I/O)
Command
ALTER TABLE TEST_NOCOMP MOVE NOCOMPRESS;
ALTER TABLE TEST_BASIC MOVE COMPRESS BASIC;
ALTER TABLE TEST_OLTP MOVE COMPRESS FOR OLTP;
MOVE : 이전에 저장되어 있던 DATA들도 압축
MOVE 생략 시 이후에 들어오는 DATA들에 한하여 압축
SQL> INSERT /*+append*/ INTO ... VALUES ...
SQL> COMMIT;
OLTP Compression
Online Transaction Processing
= 그냥 트랜잭션
'Database > Oracle' 카테고리의 다른 글
| [Oracle] Transaction과 Record (0) | 2024.02.21 |
|---|---|
| RMAN (0) | 2023.11.12 |
| [Oracle] 자주 쓰는 명령어 (0) | 2023.11.10 |
| [Oracle] 관리자 계정(system, sys) 비밀번호 변경 (0) | 2023.03.16 |
| [Oracle] 이전 명령어 방향키로 출력 (0) | 2023.03.15 |
[Oracle] Transaction과 Record
Transaction
: DB의 데이터를 조작하는 작업의 단위
병행 제어 및 회복 작업 시 처리되는 작업의 논리적 단위
사용자가 시스템에 대한 서비스 요구 시 시스템이 응답하기 위한 상태 변환 과정의 작업 단위
Commit or Not
트랜잭션 상태
- Active : 트랜잭션 실행 중
- Failed : 트랜잭션 실행에 오류가 발생하여 중단
- Aborted : 트랜잭션이 비정상적으로 종료되어 Rollback 연산을 수행한 상태
- Partially Committed : 트랜잭션의 마지막 연산까지 실패했지만, Commit 실행 직전의 상태
- Committed : 트랜잭션이 성공적으로 종료되어 Commit 실행 후의 상태
ACID 원칙을 보장해야 함
ㄴ 지킬수록 동시성은 떨어짐
ㄴ ∴ 각 Level별 Transaction Lock Level 존재
Lock
Row Lock
: Table이 row에 lock을 거는 것
- Shared Lock : select 시 잠금
- Exclusive Lock : write 시 잠금
1. 동시에 여러 Tx가 한 row에 Shared Lock을 걸 수 없음
= 여러 Tx가 동시에 row를 읽을 수 없음
2. Shared Lock이 걸려있는 row에 다른 Tx가 Exclusive Lock을 걸 수 없음
= 다른 Tx가 row를 읽는 동안 다른 Tx는 수정 및 삭제 불가능
3. Exclusive Lock이 걸려있는 동안 다른 Tx는 Shared/Exclusive 즉 모든 Lock을 걸 수 없음
Record Lock
: DB의 Index Record에 걸리는 Lock
- Shared Lock : select 시 잠금
- Exclusive Lock : write 시 잠금
Gap Lock
Index Record의 Gap 사이에 걸리는 Lock
record Table에서 인덱스와 인덱스 사이에 존재
= record가 없는 부분에 걸리는 Lock
┌ 새로운 row의 추가 방지
Record Lock Vs. Gap Lock
ㄴ이미 있는 row가 변경되지 않게
*Index
Data의 Record에 빠르게 접근하기 위해 <키, 값, 주소> 로 구성된 데이터 구조
Record
- Table 형태의 데이터 타입
- 여러 개의 Data Type을 갖는 변수들의 집합
- 논리적 단위
- 필드 집합 처리
- ( ≒ C언어의 Struct)
- 테이블과 다르게 개별 필드 이름 부여 가능
- 선언 시 초기화 가능
- 레코드가 가질 수 있는 row의 수는 1개
선언 방식에 따라 커서형, 사용자 정의형, 테이블형 레코드로 나뉨
1. 사용자 정의형 레코드
: 선언한 레코드 변수를 통해 내부의 속성들에 접근
테이블의 컬럼에 해당하는 것을 필드라고 한다.
TYPE 레코드명 IS RECORD (
	필드명1 필드1 타입[ [NOT NULL] := 디폴트값 ],
    필드명2 필드2 타입[ [NOT NULL] := 디폴트값 ]
	...
);
레코드변수명 레코드명;
예시 1)
DECLARE
    TYPE dept_rect IS RECORD(			-- dep 레코드 타입 선언
      department_id NUMBER := 1,		--혹은 departments.department_id%TYPE
      department_name VARCHAR2(80),		--혹은 departments.department_name%TYPE
      parent_id NUMBER(6),
      manager_id NUMBER(6));

    vr_dept_rect dept_rect;				-- 위에서 선언된 타입으로 레코드 변수 선언

 BEGIN
    DBMS_OUTPUT.PUT_LINE(vr_dept_rect.department_id);
 END;
예시 2)
DECLARE
    TYPE emp_type IS RECORD(			-- emp_type 레코드 타입 선언
      emp_no NUMBER(4) NOT NULL := 0,
      ename emp.ename%TYPE,
      JOB VARCHAR2(9)
   	);
    v_emp	emp_type;					-- 위에서 선언된 타입으로 레코드 변수 선언

 BEGIN
    v_emp.empno := 9000;
    v_emp.ename :='hong';
    v_emp.job := 'dr';

    DBMS_OUTPUT.PUT_LINE('empno' = ' || v_emp.empno);
    DBMS_OUTPUT.PUT_LINE('ename' = ' || v_emp.ename);
    DBMS_OUTPUT.PUT_LINE('job' = ' || v_emp.job);
 END;


/**************************** 실행 결과
 EMPNO = 9000
 ENAME = HONG
 JOB = DR
 *************************************/
2. 테이블형 레코드
: 특정 테이블의 모든 컬럼을 받을때 사용하는 레코드 타입이다. %TYPE 대신 %ROWTYPE으로 선언
레코드 변수명 테이블명.%ROWTYPE;예시 1)
DECLARE
    vr_dept_rect departments%ROWTYPE;

    BEGIN
      SELECT * into vr_dept_rect from departments where department_id = 10;
      DBMS_OUTPUT.PUT_LINE(vr_dept_rect.department_id);

END;
3. 커서형 레코드
: Cursor를 레코드 변수로 받는 것
커서명%ROWTYPE;DECLARE
CURSOR cur_dep IS
SELECT * from departments;
vr_dep cur_dep%ROWTYPE;
BEGIN
OPEN cur_dep;
LOOP
FETCH cur_dep INTO vr_dep;
EXIT WHEN cur_dep%NOTFOUND;
DBMS_OUTPUT.PUT_LINE(vr_dep.department_id);
DBMS_OUTPUT.PUT_LINE(vr_dep.department_name);
END LOOP;
DBMS_OUTPUT.PUT_LINE(cur_dep%ROWCOUNT);
--DBMS_OUTPUT.PUT_LINE(vr_dep%ROWCOUNT);
END;'Database > Oracle' 카테고리의 다른 글
| [Oracle] Compress (0) | 2024.02.29 |
|---|---|
| RMAN (0) | 2023.11.12 |
| [Oracle] 자주 쓰는 명령어 (0) | 2023.11.10 |
| [Oracle] 관리자 계정(system, sys) 비밀번호 변경 (0) | 2023.03.16 |
| [Oracle] 이전 명령어 방향키로 출력 (0) | 2023.03.15 |
RMAN
-- sqlplus 접속
sqlplus / as sysdba

ALTER SYSTEM SET log_archive_dest='/ARC_STR' SCOPE=SPFILE;
ALTER SYSTEM SET log_archive_format='ARCH_STR_%r_%t_%s.ARC' SCOPE=SPFILE;


-- 아카이브 로그 모드 변경
shutdown immediate;
startup mount;
alter database archivelog;
archive log list;
alter database open
-- rman 접속
rman target /

-- DB 전체 정보
report schema;

-- DB 파일 상태 점검
validate database;


-- FRA 설정으로 인한 오류
-- ORA-19625: error identifying file /FRA/STR/archivelog/2022_12_16/o1_mf_1_22_ksrogsbd_.arc
-- ORA-27037: unable to obtain file status

rman target /
change archivelog all crosscheck;
-- rman 설정 변경
-- 2일 전의 백업까지
rman target /
CONFIGURE RETENTION POLICY TO RECOVERY WINDOW OF 2 DAYS;
CONFIGURE CONTROLFILE AUTOBACKUP FORMAT FOR DEVICE TYPE DISK TO '/RMANBKP/control/control_%F';
CONFIGURE SNAPSHOT CONTROLFILE NAME TO '/RMANBKP/control/snapcontrol_STR.f';
-- rman 설정 원복
CONFIGURE RETENTION POLICY CLEAR;
CONFIGURE CONTROLFILE AUTOBACKUP FORMAT FOR DEVICE TYPE DISK CLEAR;
CONFIGURE SNAPSHOT CONTROLFILE NAME CLEAR;
-- rman 설정 확인
show all; rman 백업
oracle 계정
********************************************************/
rman target /
-- %T (YYYYMMDD) 년월일 포멧
-- %U 시스템 생성 고유 파일 이름 8자리
-- 전체 백업
backup database;
backup database format '/RMANBKP/STRDB2_full_n_bkp_%T_%U';
-- 전체 백업 + 압축
backup as compressed backupset database format '/RMANBKP/STRDB2_full_c_bkp_%T_%U';
-- 백업 상태 확인
list backup;
list backup summary;
host 'ls -lh /RMANBKP';export NLS_DATE_FORMAT="YYYY/MM/DD(DY) HH24:MM:SS"'Database > Oracle' 카테고리의 다른 글
| [Oracle] Compress (0) | 2024.02.29 |
|---|---|
| [Oracle] Transaction과 Record (0) | 2024.02.21 |
| [Oracle] 자주 쓰는 명령어 (0) | 2023.11.10 |
| [Oracle] 관리자 계정(system, sys) 비밀번호 변경 (0) | 2023.03.16 |
| [Oracle] 이전 명령어 방향키로 출력 (0) | 2023.03.15 |
[Oracle] 자주 쓰는 명령어
현재 DB 상태 확인
-- STARTED (NO MOUNT) -> MOUNTED (MOUNT) -> OPEN (OPEN)

SQL > SELECT STATUS FROM V$INSTANCE;
STATUS
------------------------------------
STARTED


SQL > SELECT STATUS FROM V$INSTANCE;
STATUS
------------------------------------
MOUNTED


SQL > SELECT STATUS FROM V$INSTANCE;
STATUS
------------------------------------
OPEN
SID 확인
SQL> SELECT INSTANCE FROM v$thread;
Database read only mode
SQL> shutdown immediate;
SQL> alter database open read only;
Database status 확인
SQL> select name, open_mode from v$database;
Database Primary/Standby 확인
SQL> select database_role from v$database;
Control file 상태 확인
SQL> SELECT controlfile_type FROM V$database;
redo group 확인
SQL> select * from v$logfile;'Database > Oracle' 카테고리의 다른 글
| [Oracle] Transaction과 Record (0) | 2024.02.21 |
|---|---|
| RMAN (0) | 2023.11.12 |
| [Oracle] 관리자 계정(system, sys) 비밀번호 변경 (0) | 2023.03.16 |
| [Oracle] 이전 명령어 방향키로 출력 (0) | 2023.03.15 |
| [Oracle] Sequence (0) | 2023.03.13 |
[SQL] 명령어
1. 유저 조회
1. 현재 유저 조회
SQL> SHOW USER;
2. DBA 권한으로 현재 유저들의 리스트를 확인
SQL> select username from dba_users;
3. 생성 된 계정 확인
> select * from dba_users;
> select * from all_users;
1.1 Role 조회
select role from dba_roles;
1.2 유저 생성 및 테이블스페이스 지정
create user 유저명 identified by 패스워드 default tablespace 테이블스페이스명;
GRANT 권한명 TO 유저명;
ex) grant DBA, RESOURCE, CONNECT to test2;
2. 테이블스페이스
1. 유저의 테이블스페이스 변경
ALTER USER 유저 DEFAULT TABLESPACE 변경할 테이블스페이스;
2. 생성 된 테이블 리스트 조회
> select table_name from tabs;
'Database > SQL' 카테고리의 다른 글
| [SQL] SQL문 실행 원리 (0) | 2023.03.13 |
|---|---|
| [SQL] DDL / DML / DCL (0) | 2023.03.10 |
[MySQL] 접속
1. MySQL 활성화 & 상태 확인
[root@kim ~]# systemctl enable mysqld && systemctl start mysqld && systemctl status mysqld
● mysqld.service - MySQL Server
   Loaded: loaded (/usr/lib/systemd/system/mysqld.service; enabled; vendor preset: disabled)
   Active: active (running) since 목 2023-03-16 14:30:58 KST; 1min 32s ago
     Docs: man:mysqld(8)
           http://dev.mysql.com/doc/refman/en/using-systemd.html
 Main PID: 1640 (mysqld)
   Status: "Server is operational"
   CGroup: /system.slice/mysqld.service
           └─1640 /usr/sbin/mysqld

 3월 16 14:30:56 kim systemd[1]: Starting MySQL Server...
 3월 16 14:30:58 kim systemd[1]: Started MySQL Server.
2. root 계정으로 MySQL 접속
[root@kim ~]# mysql -u root -p
Enter password:
Welcome to the MySQL monitor.  Commands end with ; or \g.
Your MySQL connection id is 8
Server version: 8.0.32 MySQL Community Server - GPL

Copyright (c) 2000, 2023, Oracle and/or its affiliates.

Oracle is a registered trademark of Oracle Corporation and/or its
affiliates. Other names may be trademarks of their respective
owners.

Type 'help;' or '\h' for help. Type '\c' to clear the current input statement.
3. 계정 생성을 위해 기본 DB에 접속
mysql> use mysql
Reading table information for completion of table and column names
You can turn off this feature to get a quicker startup with -A

Database changed
+ 처음에 대문자로 입력했더니 오류 계속남,, 검색하니까 DB 생성 어쩌꾸 bin 하위 폴더 어쩌구 하는데
| ERROR 1049 (42000): Unknown database 'MYSQL' |
mysql> USE MYSQL;mysql > show databases;
해보면 소문자길래 혹시 하고 소문자로 입력해보니까 됨,,ㅠ
4. 계정 생성 & 권한부여
mysql> create user 'testuser' identified by '비밀번호';
Query OK, 0 rows affected (0.00 sec)

mysql> grant all privileges on *.* to 'testuser'@'%';

-- 권한 반영
mysql> flush privileges;
※ %는 모든 권한
[MariaDB] 삭제
1. root 계정 로그인
2. MariaDB 패키지 설치 여부 확인
[oracle@kim ~]$  yum list installed mariadb\*

Loaded plugins: fastestmirror, langpacks
Loading mirror speeds from cached hostfile
 * base: mirror.kakao.com
 * epel: ftp.riken.jp
 * extras: mirror.kakao.com
 * updates: mirror.kakao.com
Error: No matching Packages to list
위 cmd 날리면 안나오는데, 아래 날리면 있다고 나옴ㅠ
[oracle@kim ~]$ rpm -qa | grep -i mariadb

mariadb-server-5.5.68-1.el7.x86_64
mariadb-libs-5.5.68-1.el7.x86_64
mariadb-5.5.68-1.el7.x86_64
3. mariadb.x86_64 1:5.5.68-1.el7, mariadb-server.x86_64 1:5.5.68-1.el7 삭제
[root@kim ~]# yum remove -y mariadb.x86_64

Loaded plugins: fastestmirror, langpacks
Resolving Dependencies
--> Running transaction check
---> Package mariadb.x86_64 1:5.5.68-1.el7 will be erased
--> Processing Dependency: mariadb(x86-64) = 1:5.5.68-1.el7 for package: 1:mariadb-server-5.5.68-1.el7.x86_64
--> Running transaction check
---> Package mariadb-server.x86_64 1:5.5.68-1.el7 will be erased
--> Finished Dependency Resolution

Dependencies Resolved

==========================================================
 Package          Arch     Version          Repository
                                                     Size
==========================================================
Removing:
 mariadb          x86_64   1:5.5.68-1.el7   @base    49 M
Removing for dependencies:
 mariadb-server   x86_64   1:5.5.68-1.el7   @base    58 M

Transaction Summary
==========================================================
Remove  1 Package (+1 Dependent package)

Installed size: 107 M
Downloading packages:
Running transaction check
Running transaction test
Transaction test succeeded
Running transaction
  Erasing    : 1:mariadb-server-5.5.68-1.el7.x86_64   1/2
경고: /var/log/mariadb/mariadb.log(이)가 /var/log/mariadb/mariadb.log.rpmsave(으)로 저장되었습니다
  Erasing    : 1:mariadb-5.5.68-1.el7.x86_64          2/2
  Verifying  : 1:mariadb-server-5.5.68-1.el7.x86_64   1/2
  Verifying  : 1:mariadb-5.5.68-1.el7.x86_64          2/2

Removed:
  mariadb.x86_64 1:5.5.68-1.el7

Dependency Removed:
  mariadb-server.x86_64 1:5.5.68-1.el7

Complete!
[root@kim ~]# rpm -qa | grep -i mariadb
mariadb-libs-5.5.68-1.el7.x86_64
위 안되면, 아래 명령어로 수동 삭제
$ yum remove -y MariaDB-client.x86_64
$ yum remove -y MariaDB-common.x86_64
$ yum remove -y MariaDB-compat.x86_64
$ yum remove -y MariaDB-server.x86_64
4. lib 파일 제거
[root@kim ~]# yum -y remove mariadb-libs

Loaded plugins: fastestmirror, langpacks
Resolving Dependencies
--> Running transaction check
---> Package mariadb-libs.x86_64 1:5.5.68-1.el7 will be erased
--> Processing Dependency: libmysqlclient.so.18()(64bit) for package: perl-DBD-MySQL-4.023-6.el7.x86_64
--> Processing Dependency: libmysqlclient.so.18()(64bit) for package: 2:postfix-2.10.1-9.el7.x86_64
--> Processing Dependency: libmysqlclient.so.18(libmysqlclient_18)(64bit) for package: perl-DBD-MySQL-4.023-6.el7.x86_64
--> Processing Dependency: libmysqlclient.so.18(libmysqlclient_18)(64bit) for package: 2:postfix-2.10.1-9.el7.x86_64
--> Running transaction check
---> Package perl-DBD-MySQL.x86_64 0:4.023-6.el7 will be erased
---> Package postfix.x86_64 2:2.10.1-9.el7 will be erased
--> Finished Dependency Resolution

Dependencies Resolved

==========================================================
 Package         Arch    Version         Repository  Size
==========================================================
Removing:
 mariadb-libs    x86_64  1:5.5.68-1.el7  @anaconda  4.4 M
Removing for dependencies:
 perl-DBD-MySQL  x86_64  4.023-6.el7     @base      323 k
 postfix         x86_64  2:2.10.1-9.el7  @anaconda   12 M

Transaction Summary
==========================================================
Remove  1 Package (+2 Dependent packages)

Installed size: 17 M
Downloading packages:
Running transaction check
Running transaction test
Transaction test succeeded
Running transaction
  Erasing    : perl-DBD-MySQL-4.023-6.el7.x86_64      1/3
  Erasing    : 2:postfix-2.10.1-9.el7.x86_64          2/3
  Erasing    : 1:mariadb-libs-5.5.68-1.el7.x86_64     3/3
  Verifying  : 2:postfix-2.10.1-9.el7.x86_64          1/3
  Verifying  : 1:mariadb-libs-5.5.68-1.el7.x86_64     2/3
  Verifying  : perl-DBD-MySQL-4.023-6.el7.x86_64      3/3

Removed:
  mariadb-libs.x86_64 1:5.5.68-1.el7

Dependency Removed:
  perl-DBD-MySQL.x86_64 0:4.023-6.el7
  postfix.x86_64 2:2.10.1-9.el7

Complete!
5. 삭제 확인
[root@kim ~]# rpm -qa | grep -i mariadb
[root@kim ~]#
+ MariaDB가 사용 했던 모든 로그까지 제거
[root@kim ~]# rm /var/log/mariadb/mariadb.log.rpmsave
rm: remove 일반 파일 `/var/log/mariadb/mariadb.log.rpmsave'?
참고 https://www.iorad.com/player/1579826/CentOs--Mysql---------1--Maria-db--- , https://ansan-survivor.tistory.com/1339
'Database > 설치' 카테고리의 다른 글
| [Tibero] CentOS7 환경에 Tibero Database 설치하기(ft. WinSCP) (0) | 2023.03.15 |
|---|---|
| [PostgreSQL] CentOS7 환경에 PostgreSQL Database 설치하기 (0) | 2023.03.15 |
| [MariaDB] CentOS7 환경에 MariaDB Database 설치하기 (0) | 2023.03.15 |
| [MySQL] CentOS7 환경에 MySQL Database 설치하기 (0) | 2023.03.14 |
[Oracle] 관리자 계정(system, sys) 비밀번호 변경
ERROR: ORA-01017 : invalid username/password; logon denied
위와 같은 오류 발생으로 sys 계정 연결 불가 시 아래 쿼리로 비밀번호 변경
[oracle@kim ~]$ lsnrctl start
[oracle@kim ~]$ sqlplus / as sysdba

Connected to an idle instance.


SQL> startup

ORACLE instance started.
Database mounted.
Database opened.

SQL> alter user sys identified by [비밀번호];

User altered.'Database > Oracle' 카테고리의 다른 글
| RMAN (0) | 2023.11.12 |
|---|---|
| [Oracle] 자주 쓰는 명령어 (0) | 2023.11.10 |
| [Oracle] 이전 명령어 방향키로 출력 (0) | 2023.03.15 |
| [Oracle] Sequence (0) | 2023.03.13 |
| [Oracle] Listener & Oracel DB (0) | 2023.03.12 |
[Tibero] CentOS7 환경에 Tibero Database 설치하기(ft. WinSCP)
1. https://technet.tmaxsoft.com/ 홈페이지 접속 & 파일 다운을 위해 가입 필요
1.1 상단의 '다운로드' - 좌측의 '데모라이선스 신청' 클릭 으로 라이선스 발급 필요
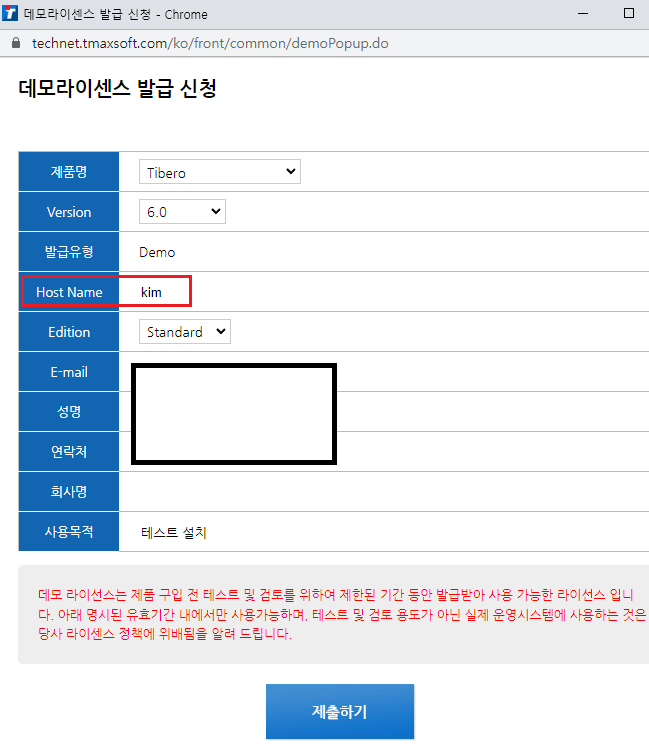
이때 Host Name은 Linux 서버의 host name과 동일하게 기입 필요
--hostname 확인
# hostname
# uname -n
2. 상단의 '다운로드' - 좌측의 '데이터베이스' - 'Tibero' - '다운로드' 클릭

3. 스크롤을 내려 하단의 'Linux - Linux (x86) 64-bit' 클릭

4. 리눅스 환경에서 tibero db 사용을 위해 티베로 전용 사용자 계정 추가
# useradd tibero
# passwd tibero
5. JDK 및 Tibero 패키지 설치 (root)
# yum install gcc gcc-c++ libstdc++ libstdc++-devele compat-libstdc++ libaio libaio-devel;
# yum install 1.8.0-openjdk-devel.x86_64 # jdk
6. WinSCP를 이용해 tar파일과 메일로 전달받은 license.xml 파일 복사

7. 압축 풀기 (tibero)
$ tar -zxvf tibero6-bin-FS07_CS_2005-linux64_3.10-189892-opt.tar.gz
8. 라이선스 파일 이동
$ mv license.xml /home/tibero/tibero6/license/
$ chown tibero:tibero /home/tibero/tibero6/license/license.xml


# cd /Tibero/tibero6/license
# ls

license.xml  oss_licenses
9. 추가 환경설정
-- 환경변수 파일 열기
# su - tibero
$ vi .bash_profile

-- 아래내용 추가
export TB_HOME=~/tibero6 --압축파일 푼 경로
export TB_SID=tibero
export LD_LIBRARY_PATH=$TB_HOME/lib:$TB_HOME/client/lib
export PATH=$PATH:$TB_HOME/bin:$TB_HOME/client/bin

-- 설정 적용
$ source .bash_profile


-- RemoveIPC 주석 제거
# su - root
# vi /etc/systemd/logind.conf


-- 환경설정
# su - root
# vi /etc/sysctl.conf

-- 아래 내용 수정
#fs.file-max = 6815744
#kernel.sem = 250 32000 100 128
kernel.shmmni = 4096
#kernel.shmall = 1073741824
#kernel.shmmax = 4398046511104
kernel.panic_on_oops = 1
net.core.rmem_default = 262144
net.core.rmem_max = 4194304
net.core.wmem_default = 262144
net.core.wmem_max = 1048576
net.ipv4.conf.all.rp_filter = 2
net.ipv4.conf.default.rp_filter = 2
fs.aio-max-nr = 1048576
#net.ipv4.ip_local_port_range = 9000 65500

kernel.shmall = 2097152
kernel.shmmax = 2147483648
kernel.sem = 10000 32000 10000 10000
fs.file-max = 6815744
net.ipv4.ip_local_port_range = 1024 65500


-- 환경설정
# vi /etc/security/limits.conf

-- 아래 내용 추가
tibero           soft    nproc           2047
tibero           hard    nproc           16384
tibero           soft    nofile          1024
tibero           hard    nofile          65536
10. Tibero 환경 파일 생성
[tibero@kim license]$ cd $TB_HOME/config
[tibero@kim config]$ ./gen_tip.sh

Using TB_SID "tibero"
/home/tibero/tibero6/config/tibero.tip generated
/home/tibero/tibero6/config/psm_commands generated
/home/tibero/tibero6/client/config/tbdsn.tbr generated.
Running client/config/gen_esql_cfg.sh
Done.
11. Tibero 기동
[tibero@kim config]$ tbboot nomount

Listener port = 8629

Tibero 6

TmaxData Corporation Copyright (c) 2008-. All rights reserved.
Tibero instance started up (NOMOUNT mode).
-> nomount 모드로 시작 시 control file 생성
-- sys 계정으로 접속 / 초기 암호(tibero) 입력
$ tbsql sys/tibero
-- Database 생성
SQL> create database "tibero" user sys identified by tibero;완료되면 quit를 입력해 tbsql을 종료하고, 티베로 서버를 NORMAL 모드로 실행한다.
[tibero@kim tibero6]$ tbboot
Listener port = 8629

Tibero 6

TmaxData Corporation Copyright (c) 2008-. All rights reserved.
Tibero instance started up (NORMAL mode).
--Data dictionary와 System 패키지생성
$ cd /home/tibero/tibero6/scripts
$ ./system.sh
Enter SYS password: tibero
Enter SYSCAT password: syscat설치 과정 중 작업 수행 여부 y/n 입력 필요
12. Tibero 서버 정상 구동 확인
[tibero@kim scripts]$ ps -ef | grep tbsvr
tibero    5345     1  0 17:08 pts/0    00:00:00 tbsvr          -t NORMAL -SVR_SID tibero
tibero    5348  5345  0 17:08 pts/0    00:00:00 tbsvr_MGWP     -t NORMAL -SVR_SID tibero
tibero    5349  5345  2 17:08 pts/0    00:00:15 tbsvr_FGWP000  -t NORMAL -SVR_SID tibero
tibero    5350  5345  0 17:08 pts/0    00:00:00 tbsvr_FGWP001  -t NORMAL -SVR_SID tibero
tibero    5351  5345  0 17:08 pts/0    00:00:00 tbsvr_PEWP000  -t NORMAL -SVR_SID tibero
tibero    5352  5345  0 17:08 pts/0    00:00:00 tbsvr_PEWP001  -t NORMAL -SVR_SID tibero
tibero    5353  5345  0 17:08 pts/0    00:00:00 tbsvr_PEWP002  -t NORMAL -SVR_SID tibero
tibero    5354  5345  0 17:08 pts/0    00:00:00 tbsvr_PEWP003  -t NORMAL -SVR_SID tibero
tibero    5355  5345  0 17:08 pts/0    00:00:00 tbsvr_AGNT     -t NORMAL -SVR_SID tibero
tibero    5356  5345  0 17:08 pts/0    00:00:01 tbsvr_DBWR     -t NORMAL -SVR_SID tibero
tibero    5357  5345  0 17:08 pts/0    00:00:00 tbsvr_RCWP     -t NORMAL -SVR_SID tibero
tibero    7264  2603  0 17:19 pts/0    00:00:00 grep --color=auto tbsvr
※ 실제 데이터가 저장되는 데이터베이스의 위치는 설치된 티베로의 디렉토리를 기준으로 /tibero6/database/{데이터베이스명}
'Database > 설치' 카테고리의 다른 글
| [MariaDB] 삭제 (0) | 2023.03.16 |
|---|---|
| [PostgreSQL] CentOS7 환경에 PostgreSQL Database 설치하기 (0) | 2023.03.15 |
| [MariaDB] CentOS7 환경에 MariaDB Database 설치하기 (0) | 2023.03.15 |
| [MySQL] CentOS7 환경에 MySQL Database 설치하기 (0) | 2023.03.14 |
[PostgreSQL] CentOS7 환경에 PostgreSQL Database 설치하기
1. https://yum.postgresql.org/ 홈페이지 접속
2. Repository 설치를 위해 'Repo RPMs' 클릭
3. 환경에 맞는 버전 마우스 오른쪽 버튼 - 링크주소 복사

4. Repository 설치
[root@key ~]# yum install -y https://download.postgresql.org/pub/repos/yum/reporpms/EL-7-x86_64/pgdg-redhat-repo-latest.noarch.rpm


Loaded plugins: fastestmirror, langpacks
pgdg-redhat-repo-latest.noarch.rpm                                                                  | 8.6 kB  00:00:00
Examining /var/tmp/yum-root-KID3Oy/pgdg-redhat-repo-latest.noarch.rpm: pgdg-redhat-repo-42.0-32.noarch
Marking /var/tmp/yum-root-KID3Oy/pgdg-redhat-repo-latest.noarch.rpm to be installed
Resolving Dependencies
--> Running transaction check
---> Package pgdg-redhat-repo.noarch 0:42.0-32 will be installed
--> Finished Dependency Resolution

Dependencies Resolved

===========================================================================================================================
 Package                       Arch                Version              Repository                                    Size
===========================================================================================================================
Installing:
 pgdg-redhat-repo              noarch              42.0-32              /pgdg-redhat-repo-latest.noarch               13 k

Transaction Summary
===========================================================================================================================
Install  1 Package

Total size: 13 k
Installed size: 13 k
Downloading packages:
Running transaction check
Running transaction test
Transaction test succeeded
Running transaction
  Installing : pgdg-redhat-repo-42.0-32.noarch                                                                         1/1
  Verifying  : pgdg-redhat-repo-42.0-32.noarch                                                                         1/1

Installed:
  pgdg-redhat-repo.noarch 0:42.0-32

Complete!
5. 저장소를 추가한 후 시스템 재부팅 수행 (권고)
# yum -y update
# reboot
6. 활성화 된 저장소 목록 확인
[root@key ~]# yum repolist


Loaded plugins: fastestmirror, langpacks
Loading mirror speeds from cached hostfile
 * base: mirror.kakao.com
 * epel: mirror-jp.misakamikoto.network
 * extras: mirror.kakao.com
 * updates: mirror.kakao.com
repo id                                    repo name                                                                 status
base/7/x86_64                              CentOS-7 - Base                                                           10,072
epel/x86_64                                Extra Packages for Enterprise Linux 7 - x86_64                            13,768
extras/7/x86_64                            CentOS-7 - Extras                                                            515
pgdg-common/7/x86_64                       PostgreSQL common RPMs for RHEL / CentOS 7 - x86_64                          388
pgdg11/7/x86_64                            PostgreSQL 11 for RHEL / CentOS 7 - x86_64                                 1,451
pgdg12/7/x86_64                            PostgreSQL 12 for RHEL / CentOS 7 - x86_64                                 1,069
pgdg13/7/x86_64                            PostgreSQL 13 for RHEL / CentOS 7 - x86_64                                   821
pgdg14/7/x86_64                            PostgreSQL 14 for RHEL / CentOS 7 - x86_64                                   550
pgdg15/7/x86_64                            PostgreSQL 15 for RHEL / CentOS 7 - x86_64                                   261
updates/7/x86_64                           CentOS-7 - Updates                                                         4,839
repolist: 33,734
7. V13 설치 가능 여부 확인
[root@key ~]# yum search postgresql13


Loaded plugins: fastestmirror, langpacks
Loading mirror speeds from cached hostfile
 * base: mirror.kakao.com
 * epel: mirror-jp.misakamikoto.network
 * extras: mirror.kakao.com
 * updates: mirror.kakao.com
================================================ N/S matched: postgresql13 ================================================
postgresql13.x86_64 : PostgreSQL client programs and libraries
postgresql13-contrib.x86_64 : Contributed source and binaries distributed with PostgreSQL
postgresql13-devel.x86_64 : PostgreSQL development header files and libraries
postgresql13-docs.x86_64 : Extra documentation for PostgreSQL
postgresql13-libs.x86_64 : The shared libraries required for any PostgreSQL clients
postgresql13-llvmjit.x86_64 : Just-in-time compilation support for PostgreSQL
postgresql13-odbc.x86_64 : PostgreSQL ODBC driver
postgresql13-plperl.x86_64 : The Perl procedural language for PostgreSQL
postgresql13-plpython3.x86_64 : The Python3 procedural language for PostgreSQL
postgresql13-pltcl.x86_64 : The Tcl procedural language for PostgreSQL
postgresql13-server.x86_64 : The programs needed to create and run a PostgreSQL server
postgresql13-test.x86_64 : The test suite distributed with PostgreSQL

  Name and summary matches only, use "search all" for everything.
8. PostgreSQL13 패키치 설치
[root@key ~]# yum -y install postgresql13 postgresql13-server


Loaded plugins: fastestmirror, langpacks
Loading mirror speeds from cached hostfile
 * base: mirror.kakao.com
 * epel: mirror-jp.misakamikoto.network
 * extras: mirror.kakao.com
 * updates: mirror.kakao.com
Resolving Dependencies
--> Running transaction check
---> Package postgresql13.x86_64 0:13.10-1PGDG.rhel7 will be installed
--> Processing Dependency: postgresql13-libs(x86-64) = 13.10-1PGDG.rhel7 for package: postgresql13-13.10-1PGDG.rhel7.x86_64
--> Processing Dependency: libpq.so.5()(64bit) for package: postgresql13-13.10-1PGDG.rhel7.x86_64
---> Package postgresql13-server.x86_64 0:13.10-1PGDG.rhel7 will be installed
--> Running transaction check
---> Package postgresql13-libs.x86_64 0:13.10-1PGDG.rhel7 will be installed
--> Finished Dependency Resolution

Dependencies Resolved

===========================================================================================================================
 Package                             Arch                   Version                           Repository              Size
===========================================================================================================================
Installing:
 postgresql13                        x86_64                 13.10-1PGDG.rhel7                 pgdg13                 1.4 M
 postgresql13-server                 x86_64                 13.10-1PGDG.rhel7                 pgdg13                 5.4 M
Installing for dependencies:
 postgresql13-libs                   x86_64                 13.10-1PGDG.rhel7                 pgdg13                 385 k

Transaction Summary
===========================================================================================================================
Install  2 Packages (+1 Dependent package)

Total download size: 7.1 M
Installed size: 31 M
Downloading packages:
경고: /var/cache/yum/x86_64/7/pgdg13/packages/postgresql13-libs-13.10-1PGDG.rhel7.x86_64.rpm: Header V4 DSA/SHA1 Signature, key ID 442df0f8: NOKEY
Public key for postgresql13-libs-13.10-1PGDG.rhel7.x86_64.rpm is not installed
(1/3): postgresql13-libs-13.10-1PGDG.rhel7.x86_64.rpm                                               | 385 kB  00:00:02
(2/3): postgresql13-13.10-1PGDG.rhel7.x86_64.rpm                                                    | 1.4 MB  00:00:02
(3/3): postgresql13-server-13.10-1PGDG.rhel7.x86_64.rpm                                             | 5.4 MB  00:00:05
---------------------------------------------------------------------------------------------------------------------------
Total                                                                                      927 kB/s | 7.1 MB  00:00:07
Retrieving key from file:///etc/pki/rpm-gpg/RPM-GPG-KEY-PGDG
Importing GPG key 0x442DF0F8:
 Userid     : "PostgreSQL RPM Building Project <pgsql-pkg-yum@postgresql.org>"
 Fingerprint: 68c9 e2b9 1a37 d136 fe74 d176 1f16 d2e1 442d f0f8
 Package    : pgdg-redhat-repo-42.0-32.noarch (@/pgdg-redhat-repo-latest.noarch)
 From       : /etc/pki/rpm-gpg/RPM-GPG-KEY-PGDG
Running transaction check
Running transaction test
Transaction test succeeded
Running transaction
  Installing : postgresql13-libs-13.10-1PGDG.rhel7.x86_64                                                              1/3
  Installing : postgresql13-13.10-1PGDG.rhel7.x86_64                                                                   2/3
  Installing : postgresql13-server-13.10-1PGDG.rhel7.x86_64                                                            3/3
  Verifying  : postgresql13-server-13.10-1PGDG.rhel7.x86_64                                                            1/3
  Verifying  : postgresql13-13.10-1PGDG.rhel7.x86_64                                                                   2/3
  Verifying  : postgresql13-libs-13.10-1PGDG.rhel7.x86_64                                                              3/3

Installed:
  postgresql13.x86_64 0:13.10-1PGDG.rhel7                  postgresql13-server.x86_64 0:13.10-1PGDG.rhel7

Dependency Installed:
  postgresql13-libs.x86_64 0:13.10-1PGDG.rhel7

Complete!
9. 기본 데이터베이스 설정 (초기화)
# sudo /usr/pgsql-13/bin/postgresql-13-setup initdb

Initializing database ... OK
+ 이때, 기본 데이터베이스는 'postgres' 이름으로 생성 됨
10. PostgreSQL 서비스 구동
[root@key ~]# systemctl status postgresql-13
● postgresql-13.service - PostgreSQL 13 database server
   Loaded: loaded (/usr/lib/systemd/system/postgresql-13.service; disabled; vendor preset: disabled)
   Active: inactive (dead)
     Docs: https://www.postgresql.org/docs/13/static/
처음에 cmd 입력 했더니 .service도 disabled / Active : inactive (dead) ,,,,
아래와 같이 enable, start 시켜줌
[root@key ~]# sudo systemctl enable postgresql-13
Created symlink from /etc/systemd/system/multi-user.target.wants/postgresql-13.service to /usr/lib/systemd/system/postgresql-13.service.
[root@key ~]# systemctl start postgresql-13
[root@key ~]# systemctl status postgresql-13
● postgresql-13.service - PostgreSQL 13 database server
   Loaded: loaded (/usr/lib/systemd/system/postgresql-13.service; enabled; vendor preset: disabled)
   Active: active (running) since 수 2023-03-15 13:55:21 KST; 4s ago
     Docs: https://www.postgresql.org/docs/13/static/
  Process: 10788 ExecStartPre=/usr/pgsql-13/bin/postgresql-13-check-db-dir ${PGDATA} (code=exited, status=0/SUCCESS)
 Main PID: 10794 (postmaster)
    Tasks: 8
   CGroup: /system.slice/postgresql-13.service
           ├─10794 /usr/pgsql-13/bin/postmaster -D /var/lib/pgsql/13/data/
           ├─10796 postgres: logger
           ├─10798 postgres: checkpointer
           ├─10799 postgres: background writer
           ├─10800 postgres: walwriter
           ├─10801 postgres: autovacuum launcher
           ├─10802 postgres: stats collector
           └─10803 postgres: logical replication launcher

 3월 15 13:55:21 key systemd[1]: Starting PostgreSQL 13 database server...
 3월 15 13:55:21 key postmaster[10794]: 2023-03-15 13:55:21.123 KST [10794] 로그:  서버 로그를 로그 수집 프로세스…냅니다.
 3월 15 13:55:21 key postmaster[10794]: 2023-03-15 13:55:21.123 KST [10794] 힌트:  이제부터 서버 로그는 "log" 디렉…됩니다.
 3월 15 13:55:21 key systemd[1]: Started PostgreSQL 13 database server.
Hint: Some lines were ellipsized, use -l to show in full.
[root@key ~]#
11. PostgreSQL 접속
[root@key ~]# su - postgres

-bash-4.2$ psql
psql (13.10)
도움말을 보려면 "help"를 입력하십시오.'Database > 설치' 카테고리의 다른 글
| [MariaDB] 삭제 (0) | 2023.03.16 |
|---|---|
| [Tibero] CentOS7 환경에 Tibero Database 설치하기(ft. WinSCP) (0) | 2023.03.15 |
| [MariaDB] CentOS7 환경에 MariaDB Database 설치하기 (0) | 2023.03.15 |
| [MySQL] CentOS7 환경에 MySQL Database 설치하기 (0) | 2023.03.14 |